This post primarily aims to cover different ways in which a Linux user can create virtual interfaces for VLAN tagging traffic. This is sometimes required in my job when I'm testing devices in various VLANs on a client network and they've given me a trunk port to plug into.
To somewhat diferentiate this post from other such posts, I will also include a mini walkthrough on how to use a Cisco switch to test this at home.
Pre-reqs
To be able to tag traffic/assign VLAN ids to interfaces we need to install a package and ensure the module is loaded.
sudo apt install vlan
modprobe 8021q
We can then use the command modinfo 8021q to verify it is loaded, and to make sure the module is loaded on each reboot I suggest the following: sudo sh -c 'echo 8021q >> /etc/modules'
Method #1: Graphical Network Manager
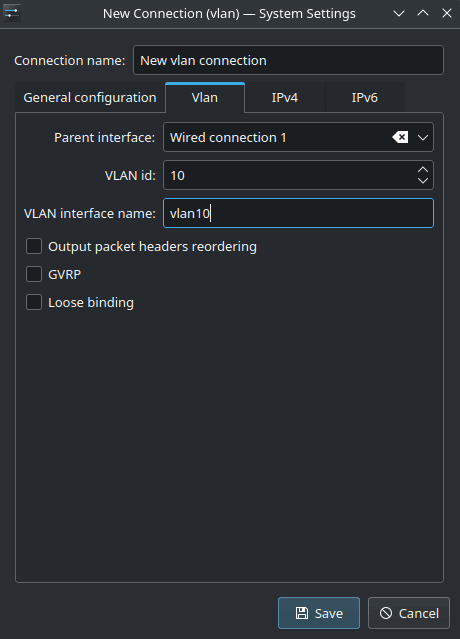
Depending on the desktop environment in use, the network manager may have an option to create a VLAN connection. Plain Ubuntu does not anymore... because GNOME devs do GNOME dev things. I use Kubuntu (KDE) so the example screenshots below are from that. It is pretty straight forward, simply enter the network manager and create a new connection using the VLAN option inside the 'Virtual connections' section of the menu.

When configuring the connection you get four tabs. Generally only two will be of interest, the Vlan and the IPv4 tabs. On the Vlan tab choose the parent interface - this is the physical ethernet interface on top of which we will set our virtual interface. Also set the VLAN id and give it an appropriate name. On the IPv4 tab set the IP address you have been assigned, the network mask and default gateway.

Method #2: Netplan
Inside /etc/netplan we can find a file named something like 01-network-manager-all.yaml - names may differ across distros. Interface configurations can be added in here as demonstrated below. This method may be preferable for speed if creating numerous interfaces over the graphical method. Take note of the interface name you use for the parent ethernet interface. We can find the auto-generated interface name for the physical interface by using the command ip a. In my case it is something like enx00e04c680a38 (yuck).
network:
  ethernets:
    enx00e04c680a38:
      dhcp4: false
      dhcp6: false
      addresses: [192.168.0.200/24]
      routes:
        - to: default
          via: 192.168.0.1

  vlans:
    vlan10:
      id: 10
      link: enx00e04c680a38
      addresses: [192.168.50.100/24]
Note: Setting an IP/route on the parent (physical) interface isn't a necessity.
Once all the vlan interfaces are configured, load them with sudo netplan apply. To remove them at the end of testing simply delete them from the same file and use netplan apply again.
Method #3: ip
If you don't care about the interface only being temporary, or want to just fire off a couple of commands on the cmdline to get it configured, this can be done with the ip command. You will again need to know the name of the parent interface, the vlan id and the IP address you will be using for your host machine.
sudo ip link add link enx00e04c680a38 name vlan10 type vlan id 10
sudo ip addr add 192.168.50.100/24 dev vlan10
Removing the interface when done is as simple as
sudo ip link del vlan10
Bonus: Home lab
Ok, this is more for my own reference than anyone elses but it might come in handy for someone.. who knows. I have a pair of old Cisco Catalyst 3750TS switches and C1841 Routers that are useful for creating tiny labs to test things, such as making sure the above VLAN guidance actually works! Below are steps to configure the switches and routers to make a mini VLAN lab. In fact for the absolute minimal testing ground all that is needed is one switch (and two devices to plug into it)
- Connect to the switch console port using serial cable, then perform a factory reset.
en
write erase
reload
(go through confirmation dialogues, choose no to saving modified config)

delete flash:/vlan.dat
reload
- Configure the management IP of the switch (the default gateway should point to a router really but we don't really care about that here)
en
conf t
interface vlan 1
ip address 10.0.1.1 255.255.255.0
no shut
exit
ip default-gateway 10.0.1.254
end
- Enable SSH on the device
en
conf t
enable secret <password>
ip domain-name rewks.lan
crypto key generate rsa
username rewks secret <password>
line vty 0 15
transport input ssh
login local
exit
ip ssh version 2
exit
We can now plug a laptop or PC into the switch using an ethernet cable, manually set the IPv4 configuration for the connection and after a short delay SSH into the switch as desired. Note: On my super old switches the supported SSH keys/ciphers etc are not quite up to modern defaults so specifying compatible options is necessary when connecting:
ssh -o KexAlgorithms=+diffie-hellman-group1-sha1 -o HostKeyAlgorithms=+ssh-rsa -c aes128-cbc [email protected]
- Create a VLAN and place an interface in it on the switch
en
conf t
vlan 10
name TestVLAN
int fast1/0/1
switchport mode access
switchport access vlan 10
end
The device that we plug into port 1/0/1 on the switch will now be sitting in VLAN 10 and it's traffic would be tagged automatically when needed. This will represent a server on the clients network. For a quick overview of the VLAN config on the switch run sh vlan brief. For a more detailed view of a given interface run sh int fast1/0/1 switchport
- Create a trunk port on the switch
en
conf t
int fast1/0/10
switchport trunk encapsulation dot1q
switchport mode trunk
end
Switch configuration is now complete! Plug your testing PC or laptop into port 1/0/10. Verify that you cannot reach the device plugged into 1/0/1, then follow the VLAN interface setup steps above and try again!